Foreword
This guide help you set up the JWCS Rocket League streamer setup. It will guide you through downloading and unpacking the zip package, preparing OBS and Streamer.Bot, setup up the Streamer.Bot Decks and setting up Rocket League.
Initial Install
- Download the zip containing all assets, OBS and Streamer.Bot from
Mediafire(TO BE ADDED) - Go to your Downloads folder and cut the archive.
- Go to This PC > C:\ (Local Disk) and paste it.
- Unzip the archive here.
- You’ll get a new folder named “OBS_RL_Tournament_Setup”. Go into it
- From here, you can start OBS and Streamer.Bot using the “shortcuts” I’ve put there. Go ahead and launch OBS first.
OBS
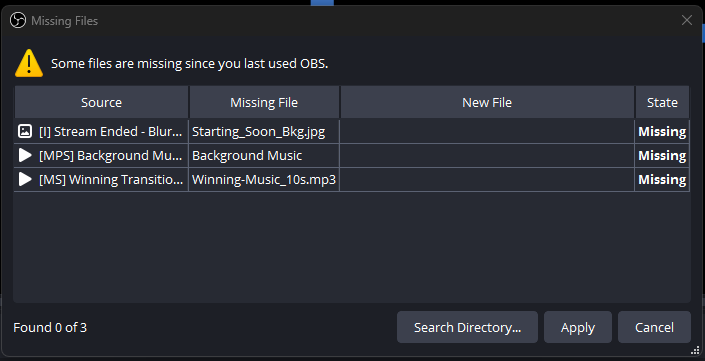
Some Files are Missing since you last used OBS!
If you see this popup, just click the Search Directory… button, then navigate to and select this folder:
Rocket League Tournament Assets. Let it search and it will find everything (and then CRASH!…yes, it crashes for me EVERY TIME when I do this…idk why…)
— Startup Check —
After you’ve started OBS and fixed any missing files, we shall go through and make sure that all the scenes look good. If all scenes pass inspection and doesn’t report any errors, we continue.
- Go to the Discord Audio scene and make sure the audio is picked up.
— Connecting Youtube —
- Go to the top left, click on Settings button.
- Then go to the Stream tab.
- In the Service dropdown box, select Youtube - RTMPS
- Click Connect Account and go through the login wizard
YT Login Info
Since the login details hasn’t been reset yet it makes us unable to login to the stream account. Please contact @vinylwalk3r for more details.
Streamer.Bot (SB):
— Connecting OBS —
- Go to Stream Apps > OBS Studio then right click and select Add.
- Change these fields:
Name= The name of this OBS connectionPassword= The password that is auto generated in OBS (we’ll go fetch this later)Auto Connect on Startup= YesReconnect on Disconnect= Yes - Click Ok and, under “Status” it should now say “Connected”.
Connectivity Status at a Glance!
You can check the connection status of any connected service in the top right hand corner! Click the “Connected x/x” text to see a dropdown with the status off all the configured services.
— Youtube —
Again, we don't have account access so contact @vinylwalk3r for help.
- Go to
Platforms>Youtube - Find the Broadcaster Account, then select Sign in with Google.
- After having logged in, it should say “Connected” whilst showing the accounts name and icon.
— Decks —
(This is needed to get the control panels to work)
- Press the Log In button at the bottom left corner. Create an account if you don’t already have one.
AND SAVE THE LOGIN CREDENTIALS IN A PASSWORD MANAGER IF YOU DONT ALREADY!
My recommendation is Bitwarden
- In the top right hand corner, click on your account icon and, in the drop down menu, select Decks. OR, if you wanna be lazy, HERE’S a link to the Decks dashboard.
Now, for the moment, SB sadly doesn’t let us export Decks. So I will have to teach you how to make your own. Please proceed to the next sub category of steps:
Making your own Decks
- Click on New Deck in the top right hand corner:
Name= Whatever you want (JWCS Control Deck maybe?)Remote Connection= YesPublic Access= No (unless you want others, outside of your home, to get access to it. You MUST, ALWAYS send a link to the person for them to have access to the Deck!) - Click on any empty button space
- Select which button type you want:
- Button - Just a button, click it and it does stuff
- Toggle Switch - On / Off button, I used these A LOT
- Status Indicator - Currently bugged to the moon, skip these.
- Slider - Cool but lacks functionality at the time of writing.
Toggle Switches
- Select Toggle Switch
- Set the Title to something indicating it’s deactivated, for example “GAMEPLAY HIDDEN”
- Change the Background Image to one of the Monochrome images in the folder
/Rocket League Tournament Assets/SB Buttons/Unactive Scenes
SB Buttons subdirectories contains Background Images for both Active and Inactive Scenes!
- Set an Icon if you want to.
- Change the Visual State toggle to “On” and redo steps 1-4 but for the Active state (“GAMEPLAY SHOWN”, for example).
- In the Actions tab, go down to the Action selection box and choose an action to trigger when we toggle this button On. Lets choose “OBS - RL Scene”
The Dropdown list is searchable! Just start typing away!
- Since we only want this to trigger when we Activate it, we don’t need to choose any action for the “Toggle Off” action.
- As a final thing, go into the Settings tab and give this button a good name in the Name text field. I like to give simple descriptive names, e.i “Gameplay Button”.
There we go, repeat those steps for all the scenes you wanna be able to switch between. And then, lets configure SB to switch the backgrounds to highlight the active one.
Current Active Scene Highlighter
- In Streamer.Bot, go to Actions & Queues > Actions
- Find the action named OBS - Active Scene Finder
- Open up any action in the top row of actions and select change the Deck to your Deck, the Item to the button we just created and State to “0”. (this is why we gave the button a good name earlier, it’s easier to find in this list later)
- Then go down and do the same to the actions in the Switch Cases, but set their States to “1”. This will activate only the button that represent the active scene (ie Gameplay or Commentator).
Winner Buttons
To make the Match Winner and Final Winner buttons, we must use a normal Button.
- Click on a empty button space
- Select Button
- Do all the settings from the Toggle Switches, except for the differing states. This button only has one state.
- Go to the Actions tab. This is where we will make it ask for input.
- Select you Action.
- Under Arguments click Add Argument and add a “string”. Set the Name to, either,
winner-nameif it’s the Match Winner button, ORfinal-winnerif it’s the Final Winner button but leave the string empty. - Go down to Inputs and create and click Add Input Argument. Then choose text, match the Name to the name given to the Argument above (!) then write a descriptive question in the Label field. For example, “Who Won?” (thats the question I used).
Done! Now, if you click this button, it will bring up a text box and ask for your input, then pipe that into OBS and change the Winner Title!
Clearing Highlight Clips Between Matches
To help me keep the Highlight reels fresh, I created a SB Action called “Delete Old Highlights” which runs a tiny .bat file I wrote that help me. To use it, create a button that points to the SB Action. Easy as that.
Empty Highlights Dir.bat
# This moves into the Highlights directory
cd Highlights
# This calls "delete" to empty the current dir and does it without questions
del *.* /Q
Rocket League
— Installing CustomUI —
To install CustomUI in Rocket League, we first need to install BakkesMod. They got a nifty installer so download and run that.
Then we have to install CustomUI. Go to CustomUIs Bakkesmods page and click on the Install with BakkesMod. Let it do it’s thing and you should now have CustomUI installed.
— Preparing the Overlays —
This will be the time consuming part.
- Go to
C:\OBS_RL_Tournament_Setup\Rocket League Tournament Assets\Bakkesmods Presets - Lets start with making a copy of Example - MATCH.
- Edit Match1.png and add the names of the contestants.
- Next, change the preset.json. Use the key combination
CTRL + F + Hto open the “Find-and-Replace” window in your text editor (I’m guess Notepad for this example, we don’t need anything fancy). - Write “EXAMPLE” in the top text box, and "
" in the bottom one. Maybe name it after the contestants (“CONTESTANT1 CONTESTANT2”) or “MATCH-1”? This will be the name that shows up in CustomUIs “Choose a Preset” dropdown menu. So make it good. Then simply click Replace All and your done. DON’T FORGET TO SAVE THE FILE! - Rename the folder we just worked in to THE SAME NAME you used in step 5!
- Save it and redo steps 2 through 6 until you have presets for every match you’ll be streaming.
After your down, finally, we have to move our custom overlays into the Presets folder. Cut out all your newly made Presets folders and move them here:
C:\Users\<your-username>\AppData\Roaming\bakkesmod\bakkesmod\data\CustomUI\Presets
— Using CustomUI —
Startup
Okay, so now CustomUI is installed. Lets see if it’s working. Press the Windows key and type “bakkesmod”. Press Enter and this small window should open:
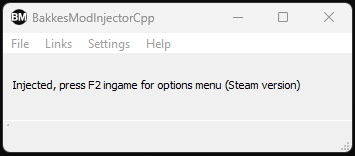
Thats the BakkesMod DLL injector. Let it be open and start Rocket League. The small windows should say “Injecting” followed by what you see in the image. That means that it’s working.
Now, press F3 and this window should pop up:
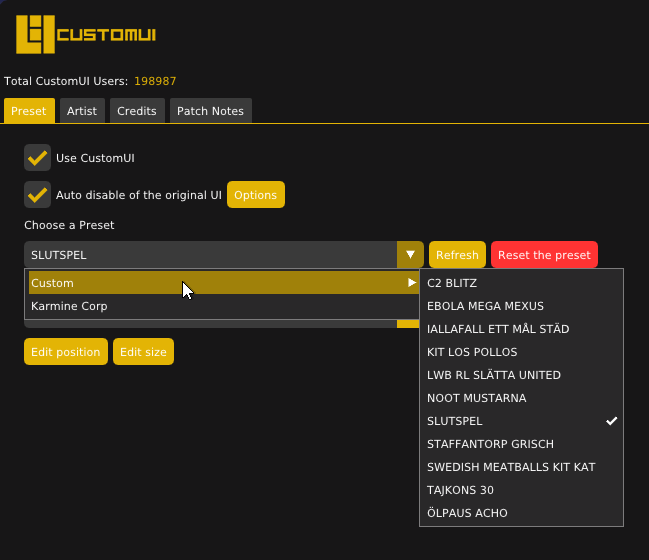
Thats the CustomUI management window. We’ll get to know this little window VERY well during the stream.
We will be using Choose a Preset and Edit Position / Size A LOT.
Ingame
- Start a Practice Match and give both sides robot players then join as spectator.
- Press F3 and choose a preset. It probably need moving and resizing.
- In the dropdown “Choose Items to Move or Resize” select Score All Items.
- Then move or resize as need be.
So you need finer editing controls, aye?
If more individual resizing or moving of parts of the UI is necessary, switch tab to Artist and tick the checkbox. Then go back and find a lot more parts open to editing. Just remember to untick that box when your done, to get back the “Score All Items” option.
Refrences
- Streamer.Bot Documentation https://docs.streamer.bot/get-started/introduction
- Bitwarden https://bitwarden.com
- BakkesMod https://bakkesplugins.com
- Custom IU on BakkesMod https://bakkesplugins.com/plugin/503